

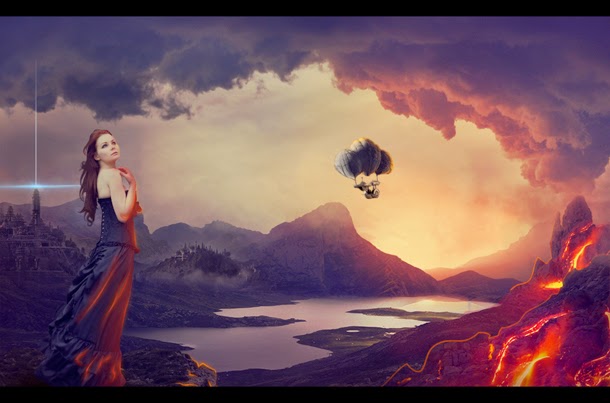
In this tutorial, we will learn how to create a Dark photo manipulation. We are going to learn the
process of creating depth of field using a few advance tools. We are going to learn how to blend images so seamlessly that it would look like a single image using the Brush tool, the Eraser tool and several adjustment layers.We will learn how to create light and darkness to make the background look seamless. using photoshop
Resources Used In This Tutorial
- Los Picos de Europa 1 – AdenarKaren
- Los Picos de Europa 27 – AdenarKaren
- Los Picos de Europa 28 – AdenarKaren
- Mountain lake 03 – xxMyNightmarexx
- Los Picos de Europa 10 – AdenarKaren
- Sunrise In Norway Part Three – SkyStockProvider
- Eyrin 1 – liam-stock
- SteamPunk Boat – mysticmorning
- Stock 629 – leeroi1-stock
- Lava – angeltouch1
- Molten lava river – SparkyLeigh
- Lens flare-1 – leostarkoneru
Step 1
Create a new file with a width of 1500 px and a height of 992 px at 300 dpi (Dots per Inch). Background Contents should be White.Now make a new layer and name it “Frames” then activate Rectangular Marquee Tool (M) and make to selection on both side and fill them with #000000 color.

Step 2
Now,let’s open the Stock 629 in Photoshop. We will be using the sky from this stock image so we will need to transfer it to our main canvas.Click the Stock 629 and press V to activate the Move Tool. Left-click the image and drag the image to the main canvas and change layer name to “Sky1″.

Now,let’s open the Sunrise In Norway Part Three in Photoshop. We will be using the sky from this stock image so we will need to transfer it to our main canvas.
Click the Sunrise In Norway Part Three and press V to activate the Move Tool. Left-click the image and drag the image to the main canvas and change layer name to “sky2″.

Now Desaturate (Shift+Ctrl+U) the whole image .

Now add vector mask from the bottom of layers palette .
Now activate Brush tool (B) with these settings :
- Brush size: 400px
- Hardness: 0%
- Opacity: 40%
- Flow: 100%
- Color: #000000

Now create new Color Balance adjustment layer from the bottom of layers palette .Press Alt+left click in between 2 layer’s (sky2 layer and Color Balance) to make a mask.
When the Color Balance box opens, input the following:

Now create a new Hue/Saturation adjustment layer from the bottom of layers palette .Press Alt+left click in between 2 layer’s (sky2 layer and Hue/saturation) to make a mask.
When the Hue/saturation box opens, input the following:

Now create new Curves adjustment layer from the bottom of layers palette .Press Alt+left click in between 2 layer’s (sky2 layer and Curves) to make a mask. When the Curves box opens, input the following:

Step 3
Now,let’s open the Los Picos de Europa 1 in Photoshop. We will be using the mountain from this stock image so we will need to transfer it to our main canvas.Click the Los Picos de Europa 1 and press V to activate the Move Tool. Left-click the image and drag the image to the main canvas and change layer name to “mountain1″.

Now create new Curves adjustment layer from the bottom of layers palette .Press Alt+left click in between 2 layer’s (mountain1 layer and Curves) to make a mask.
When the Curves box opens, input the following:

Now create new Hue/Saturation adjustment layer from the bottom of layers palette .Press Alt+left click in between 2 layer’s (mountain1 layer and Hue/Saturation) to make a mask.
When the Hue/Saturation box opens, input the following:

Now add vector mask from the bottom of layers palette .
Now activate Brush tool (B) with these settings :
- Brush size: 400px
- Hardness: 0%
- Opacity: 40%
- Flow: 100%
- Color: #000000

The result should be similar to this:

Step 4
Now,let’s open the Mountain lake 03 in Photoshop. We will be using the sky from this stock image so we will need to transfer it to our main canvas.Click the Mountain lake 03 and press V to activate the Move Tool. Left-click the image and drag the image to the main canvas and change layer name to “Lake”.

Now create new Color/Balance adjustment layer from the bottom of layers palette .Press Alt+left click in between 2 layer’s (Lake layer and Color/Balance) to make a mask.
When the Color/Balance box opens, input the following:

Now create new Hue/Saturation adjustment layer from the bottom of layers palette .Press Alt+left click in between 2 layer’s (Lake layer and Hue/Saturation) to make a mask.
When the Hue/Saturation box opens, input the following:

Now add vector mask from the bottom of layers palette .
Now activate Brush tool (B) with these settings :
- Brush size: 400px
- Hardness: 0%
- Opacity: 40%
- Flow: 100%
- Color: #000000

The result should be similar to this:

Step 5
Now make a duplicate of mountain1 layer and name it “mountain2″.Then activate the Transform Tool (Ctrl/Cmd +T), then while the “mountain2” layer is selected and then resize it as shown below:
Step 6
Now,let’s open the Los Picos de Europa 28 in Photoshop. We will be using the mountain from this stock image so we will need to transfer it to our main canvas.Click the Los Picos de Europa 28 and press V to activate the Move Tool. Left-click the image and drag the image to the main canvas and change layer name to “mountain3″.

Now create new Hue/Saturation adjustment layer from the bottom of layers palette .Press Alt+left click in between 2 layer’s (mountain3 layer and Hue/Saturation) to make a mask.
When the Hue/Saturation box opens, input the following:

Now create new Color/Balance adjustment layer from the bottom of layers palette .Press Alt+left click in between 2 layer’s (mountain3 layer and Color/Balance) to make a mask.
When the Color/Balance box opens, input the following:

Now create new Curves adjustment layer from the bottom of layers palette .Press Alt+left click in between 2 layer’s (mountain3 layer and Curves) to make a mask.
When the Curves box opens, input the following:

Now add vector mask from the bottom of layers palette .
Now activate Brush tool (B) with these settings :
- Brush size: 400px
- Hardness: 0%
- Opacity: 40%
- Flow: 100%
- Color: #000000

The result should be similar to this:

Step 7
Now,let’s open the Los Picos de Europa 27 in Photoshop. We will be using the rock from this stock image so we will need to transfer it to our main canvas.Click the Los Picos de Europa 27 and press V to activate the Move Tool. Left-click the image and drag the image to the main canvas and change layer name to “rock”.

Now create new Hue/Saturation adjustment layer from the bottom of layers palette .Press Alt+left click in between 2 layer’s (mountain3 layer and Hue/Saturation) to make a mask.
When the Hue/Saturation box opens, input the following:

Now add vector mask from the bottom of layers palette .
Now activate Brush Tool (B) with these settings :
- Brush size: 400px
- Hardness: 0%
- Opacity: 40%
- Flow: 100%
- Color: #000000

The result should be similar to this:.

Step 8
Now create a Gradient Map adjustment layer which can be found by pressing on the Layer>New Adjustment Layer>Gradient…When the gradient map box opens, input the following:

Change it’s Layer mode to “Pin Light” and opacity to “45%” and Fill to “29%” .

Now create a new layer above greadient map layer and name it “Orange”.
Now activate Brush tool (B) with these settings :
- Brush size: 400px
- Hardness: 0%
- Opacity: 100%
- Flow: 100%
- Color: #ff7900

Next, change it’s Layer mode to Color Dodge and opacity to 73% and Fill to 69%.

Now create one more layer above orange layer and name it “Shadow and refelaction”.Now we will add some highlights to our image see as below :

Now reduce it’s layer Fill to 57% .

Now we will add some clouds in our image so install cloud brush then create a new layer and name it “Clouds” .
Now activate Brush tool (B) with these settings :
- Brush size: 400px
- Hardness: 0%
- Opacity: 40%
- Flow: 100%
- Color: See in the image

The result should be similar.

Step 9
Now,let’s open the Castel image from source file in Photoshop. We will be using the Castel from this stock image so we will need to transfer it to our main canvas.Click the Castel image and press V to activate the Move Tool. Left-click the image and drag the image to the main canvas and change layer name to “Castel”.

Now add vector mask from the bottom of layers palette .
Now activate Brush tool (B) with these settings :
- Brush size: 400px
- Hardness: 0%
- Opacity: 40%
- Flow: 100%
- Color: #000000

The result should be similar to this:

Now create new Brightness/Contrast adjustment layer from the bottom of layers palette .Press Alt+left click in between 2 layer’s (Castel layer and Brightness/Contrast) to make a mask.
When the Brightness/Contrast box opens, input the following:

Now create new gradient map adjustment layer from the bottom of layers palette .Press Alt+left click in between 2 layer’s (Castel layer and gradient map) to make a mask.
When the gradient map box opens, input the following:

Now create new Curves adjustment layer from the bottom of layers palette .Press Alt+left click in between 2 layer’s (Castel layer and Curves) to make a mask.
When the Curves box opens, input the following:

Now create one more Curves adjustment layer from the bottom of layers palette .Press Alt+left click in between 2 layer’s (Castel layer and Curves) to make a mask.
When the Curves box opens, input the following:

Now select the mask layer of second curves layer .
Now activate Brush tool (B) with these settings :
- Brush size: 400px
- Hardness: 0%
- Opacity: 40%
- Flow: 100%
- Color: #000000

The result should be similar to this:

Step 10
Now,let’s open Los Picos de Europa 10 in Photoshop. We will be using the base ground from this stock image so we will need to transfer it to our main canvas.Click Los Picos de Europa 10 and press V to activate the Move Tool. Left-click the image and drag the image to the main canvas and change layer name to “Base”.

Now create new Hue/Saturation adjustment layer from the bottom of layers palette .Press Alt+left click in between 2 layer’s (Base layer and Hue/Saturation) to make a mask.
When the Hue/Saturation box opens, input the following:

Now create new Curves adjustment layer from the bottom of layers palette .Press Alt+left click in between 2 layer’s (Base layer and Curves) to make a mask.
When the Curves box opens, input the following:

Now create a Gradient map adjustment layer which can be found by pressing on the Create New Fill/Adjustment layer button shown on the layer window.Press Alt+left click in between 2 layer’s (Base layer and Gradient map) to make a mask.
When the Gradient map box opens, input the following:

The result should be similar to this: .

Step 11
First off, let’s open Eyrin 1 stock in Photoshop. We will be using the girl from this stock image so we will need to transfer it to our main canvas.Click the Eyrin 1 and press p to activate pen tool and then make a selection around the girl and then click V to activate the Move Tool. Left-click the image and drag the image to the main canvas and change layer name to “girl”.

Now create new Hue/Saturation adjustment layer from the bottom of layers palette .Press Alt+left click in between 2 layer’s (Girl layer and Hue/Saturation) to make a mask.
When the Hue/Saturation box opens, input the following:

Now create new Curves adjustment layer from the bottom of layers palette .Press Alt+left click in between 2 layer’s (Girl layer and Curves) to make a mask.
When the Curves box opens, input the following:

Now create a Gradient map adjustment layer which can be found by pressing on the Create New Fill/Adjustment layer button shown on the layer window.Press Alt+left click in between 2 layer’s (Base layer and Gradient map) to make a mask.
When the Gradient map box opens, input the following:

The result should be similar to this:

Step 12
Now create new Layer above girl layer and name it “Hair” then install hair brush .Now activate Brush tool (B) with these settings :
- Brush size: 400px
- Hardness: 0%
- Opacity: 100%
- Flow: 100%
- Color: #201921

The result should be similar to this:

Step 13
Now create a new layer above base layer and below girl layer and name it “girl shadow” then activate pen tool (p) and make a selection and fill it with #000000 color.
Now go to Filter>Blur>Gaussian Blur .
When the Gaussian Blur box opens, input the following:

Now go to Filter>Blur>Motion Blur.
When the Motion Blur box opens, input the following:

Step 14
Next, change its layer mode to Multiply and Opacity to 75% .
Now,let’s open the Balloon image in Photoshop. We will be using the Balloon from this stock image so we will need to transfer it to our main canvas.
Click the Balloon image and press V to activate the Move Tool. Left-click the image and drag the image to the main canvas and change layer name to “Balloon”.

Now create new b from the bottom of layers palette .Press Alt+left click in between 2 layer’s (Balloon layer and Hue/Saturation) to make a mask.
When the Hue/Saturation box opens, input the following:

Now create new Hue/Saturation adjustment layer from the bottom of layers palette .Press Alt+left click in between 2 layer’s (Balloon layer and Hue/Saturation) to make a mask.
When the Hue/Saturation box opens, input the following:

Now create new Gradient Map adjustment layer from the bottom of layers palette .Press Alt+left click in between 2 layer’s (Balloon layer and Gradient Map) to make a mask.
When the Gradient Map box opens, input the following:

The result should be similar to this:

Step 15
Now,let’s open the SteamPunk Boat in Photoshop. We will be using the ship from this stock image so we will need to transfer it to our main canvas.Click the SteamPunk Boat and press V to activate the Move Tool. Left-click the image and drag the image to the main canvas and change layer name to “Ship”.

Now Create new Curves adjustment layer from the bottom of layers palette .Press Alt+left click in between 2 layer’s (Ship layer and Curves adjustment) to make a mask.
When the Curves adjustment box opens, input the following :

Now Create new Hue/saturation adjustment layer from the bottom of layers palette .Press Alt+left click in between 2 layer’s (Ship layer and Hue/saturation adjustment) to make a mask.
When the Hue/saturation adjustment box opens, input the following :

The result should be similar to this:

Now create a new layer and name it “Rope”.
Now activate Brush tool (B) with these settings :
- Brush size: 80px
- Hardness: 0%
- Opacity: 100%
- Flow: 100%
- Color: #15172c

Step 16
Now go back to Balloon layer make a new layer above ballon layer and name it “Light1″ .Now activate Brush tool (B) with these settings :
- Brush size: 100px
- Hardness: 0%
- Opacity: 40%
- Flow: 100%
- Color: #c6a17d

Then make a layer mask of it and change it’s layer mode to “Overlay” .

Then again make a new layer and name it “Light2″ .
Now activate Brush tool (B) with these settings :
- Brush size: 60px
- Hardness: 0%
- Opacity: 100%
- Flow: 100%
- Color: #dd7411

Now change it’s layer mode to Overlay and Opacity to 65%.

Step 17
Now create a layer above Castel layer and name it “Beam” .Now activate Brush tool (B) with these settings :
- Brush size: 2 px
- Hardness: 100%
- Opacity: 100%
- Flow: 100%
- Color: #64bbe7

When the Stroke Path box opens, input the following and hit enter:

Now again make a right click this time choose “Delete Path” and hit enter.

The result should be similar to this:

Now add vector mask from the bottom of layers palette .
Now activate Brush tool (B) with these settings :
- Brush size: 400px
- Hardness: 0%
- Opacity: 40%
- Flow: 100%
- Color: #000000

The result should be similar to this:

Now,let’s open the Lens flare-1 in Photoshop. We will be using the Lens flare from this stock image so we will need to transfer it to our main canvas.
Click the Lens flare-1 and press V to activate the Move Tool. Left-click the image and drag the image to the main canvas and change layer name to “Blue Beam”. Change its layer mode to “Screen”.

Now Make a dupilicate (ctrl+j) of Blue beam layer and change it opacity to “50%” .

Step 18
Now,let’s open the Lava Texture in Photoshop. We will be using the lava from this stock image so we will need to transfer it to our main canvas.Go to Select>Color Range
When the Color Range box opens, input the following and hit enter:

While the lava part got selected press V to activate the Move Tool. Left-click the image and drag the image to the main canvas and change layer name to “Lava1″.
Make a layer mask of this layer see as below :

Now add vector mask from the bottom of layers palette .
Now activate Brush tool (B) with these settings :
- Brush size: 400px
- Hardness: 0%
- Opacity: 40%
- Flow: 100%
- Color: #000000

The result should be similar to this:

Do the same thing and add some more lava effects.

Now,let’s open the Molten lava river in Photoshop. We will be using the Molten lava river from this stock image so we will need to transfer it to our main canvas.
Click the Molten lava river and press V to activate the Move Tool. Left-click the image and drag the image to the main canvas and change layer name to “Lava4″.

Now make it a layer mask and change its layer mode to “Screen” .

Now add vector mask from the bottom of layers palette .
Now activate Brush tool (B) with these settings :
- Brush size: 400px
- Hardness: 0%
- Opacity: 40%
- Flow: 100%
- Color: #000000

The result should be similar to this:

Now,make 3 more duplicate of Lava4 layer.

Now create a layer above Lava layers and name it “smoke”.
Now activate Brush tool (B) with these settings :
- Brush size: 400px
- Hardness: 0%
- Opacity: 40%
- Flow: 100%
- Color: #000000

The result should be similar to this:

Step 19
Now create a new layer above lava layers and name it “Highlight” .Press Ctrl+Click on the vector mask of Rock layer to make the visible area selected.

In Path window choose Make work path from the bottom of the path palette.

The result should be similar to this:

Now activate Brush tool (B) with these settings :
- Brush size: 2 px
- Hardness: 100%
- Opacity: 100%
- Flow: 100%
- Color: #ca680c

When the Stroke Path box opens, input the following and hit enter.

Then again make a right click and choose Delete Path .

Now set its opacity to “54%” .

Step 20
Now follow the same steps for the lava and highlights for our mountain3 layer see as below .
Now create a new layer below Rock layer and name it “light reflection” .
Now activate Brush tool (B) with these settings :
Brush size: 400px
- Hardness: 0%
- Opacity: 40%
- Flow: 100%
- Color: #912927

The result should be similar to this:

Step 21
Now lets get back to the girls layer create a new layer above girls layer and name it “highlight1″ .Now activate Brush tool (B) with these settings :
- Brush size: 400px
- Hardness: 0%
- Opacity: 40%
- Flow: 100%
- Color: #000000

The result should be similar to this:

Create one more layer above highlight1 layer and name it “highlight2″ .
Now activate Brush tool (B) with these settings :
- Brush size: 400px
- Hardness: 0%
- Opacity: 40%
- Flow: 100%
- Color: #dd7411

Now change its layer mode to “Color dodge” and opacity to “45%” .

Now duplicate the highlight2 layer and name it “highlight3″ .
Now go to Filter>Blur>Gaussian Blur
When the Gaussian Blur box opens, input the following:

The result should be similar to this:

Now, add some more highlights .

Step 22
Now create a Color Balance adjustment layer which can be found by pressing on the Create New Fill/Adjustment layer button shown on the layer window:When the Color Balance box opens, input the following:

Select the mask layer of Color Balance adjustment layer .
Now activate Brush tool (B) with these settings :
- Brush size: 400px
- Hardness: 0%
- Opacity: 40%
- Flow: 100%
- Color: #912927

The result should be similar to this:

Step 23
Now create a Gradient Map adjustment layer which can be found under Layer>New Adjustment Layer>Gradient Map. When the Gradient Map box opens, input the following:
Now activate Brush tool (B) with these settings :
- Brush size: 400px
- Hardness: 0%
- Opacity: 40%
- Flow: 100%
- Color: #912927

The result should be similar to this:


0 comments:
Post a Comment